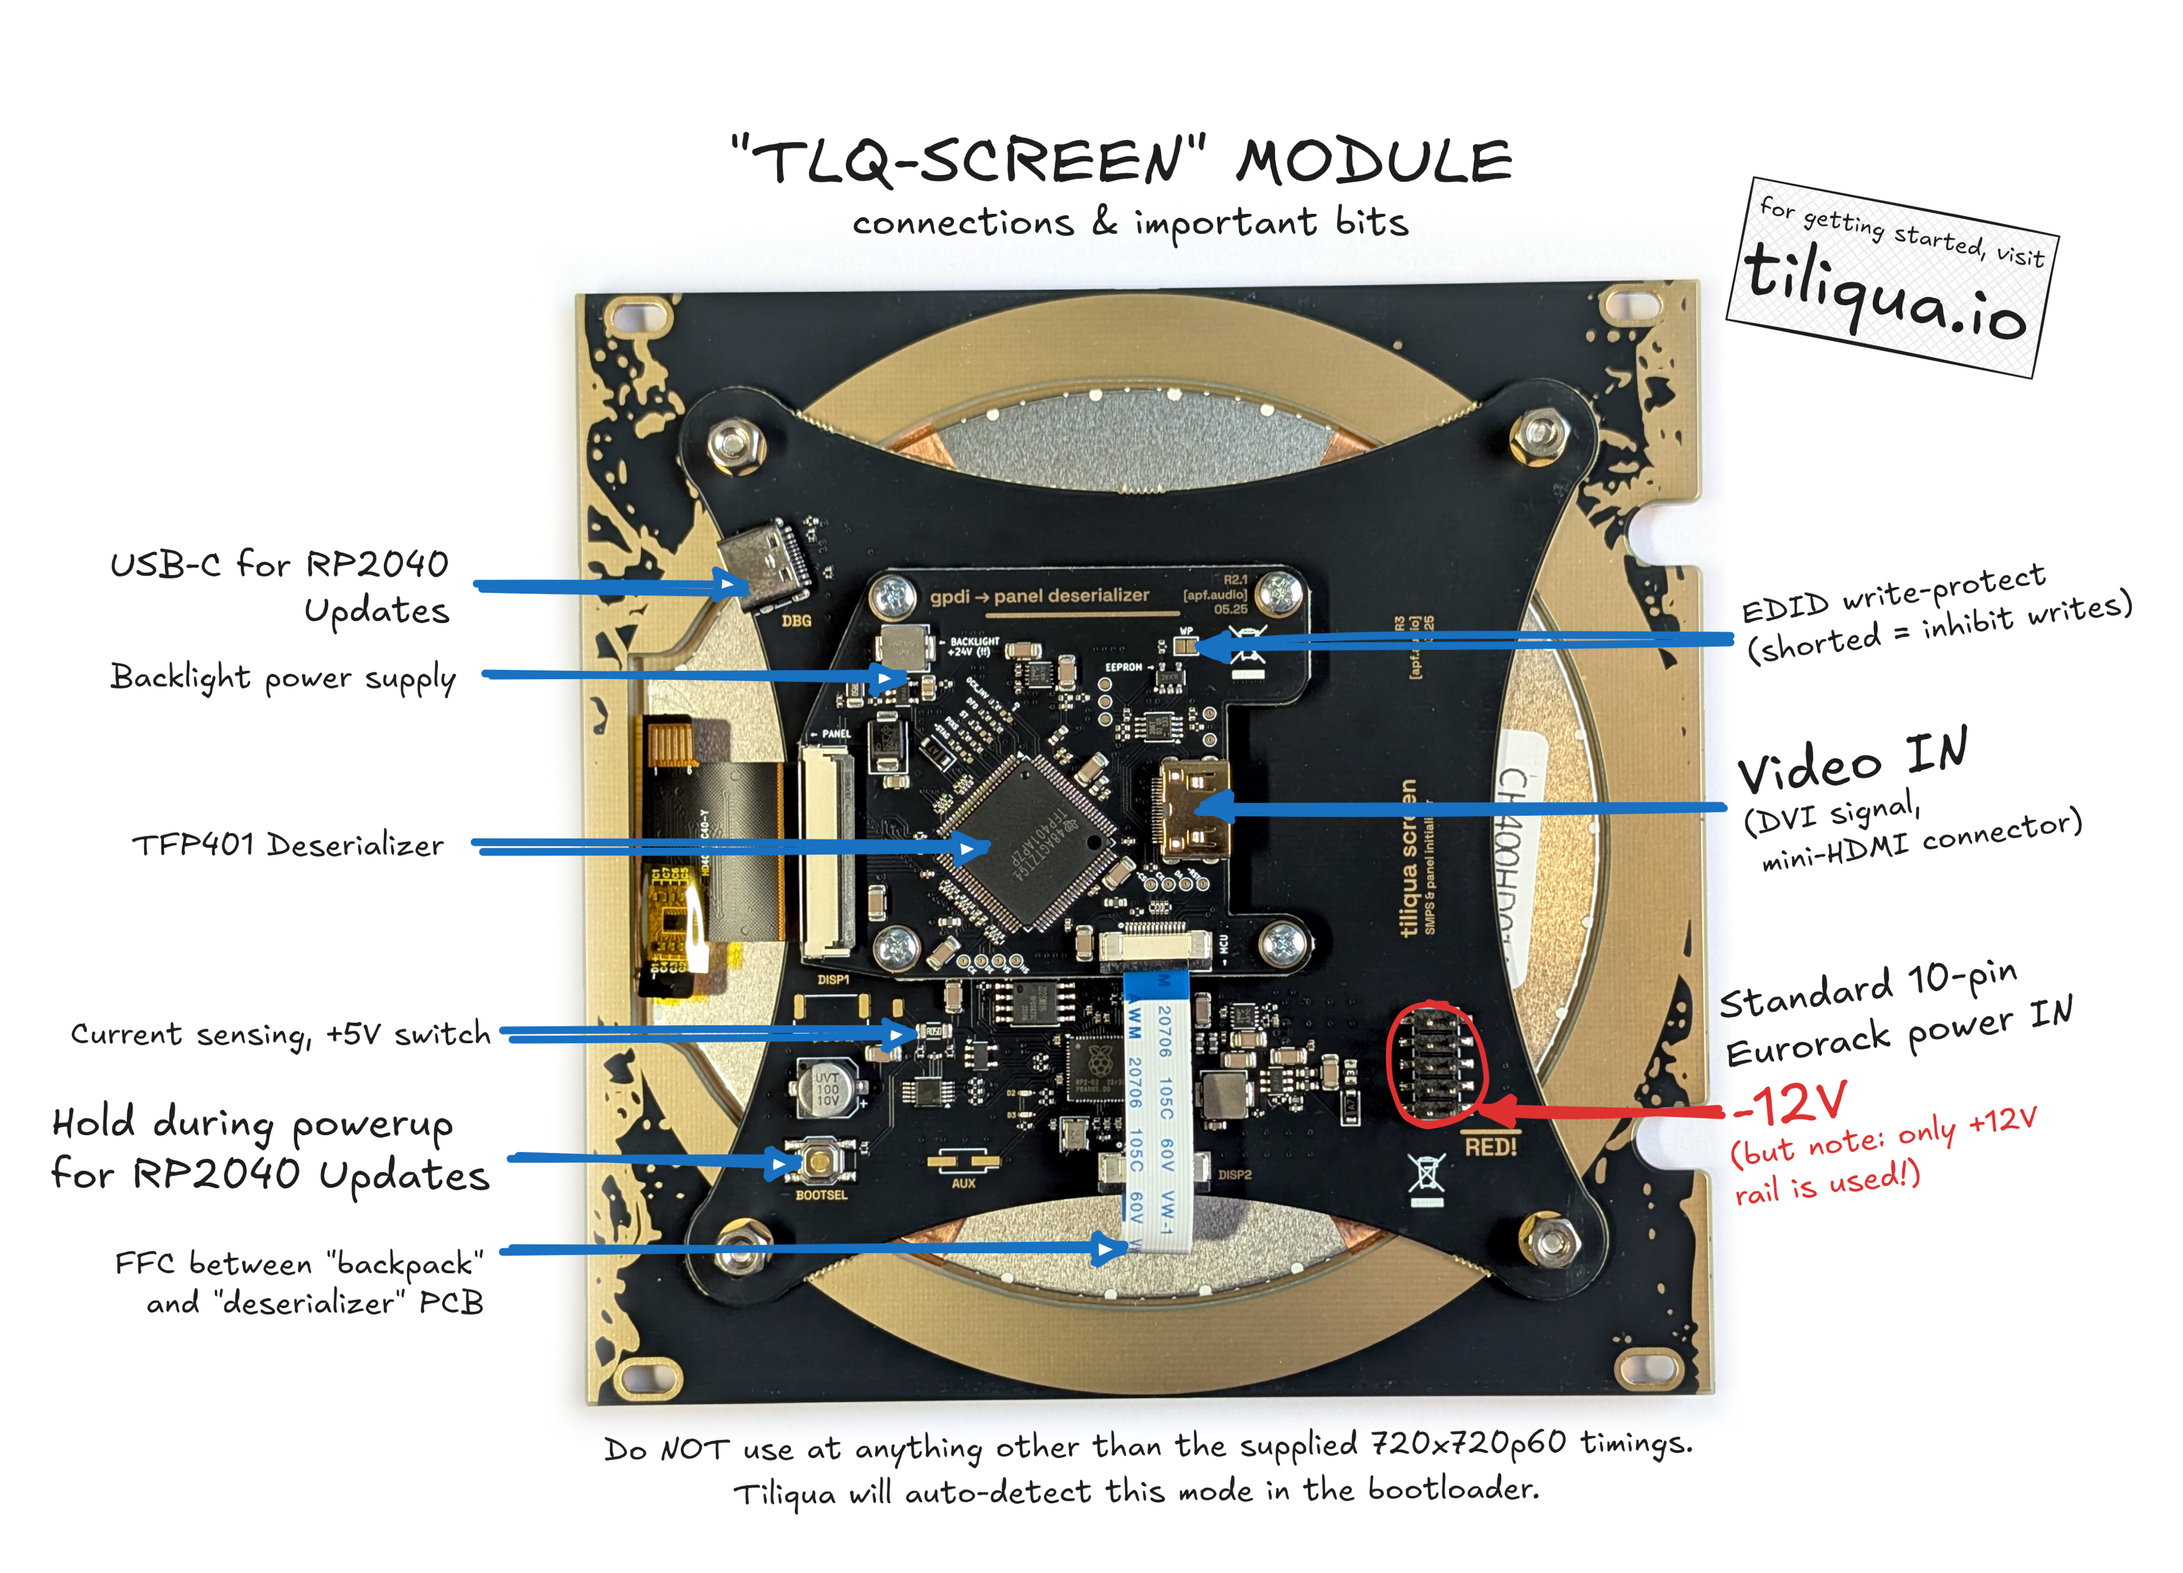
Tiliqua Screen [TLQ-SCREEN]
Tiliqua Screen is shipped ready-to-use. To get started, all you need to do is connect the Eurorack +/- 12V ribbon cable, connect the display cable to Tiliqua, and then switch the Eurorack power on.
Warning
I recommend only plugging or unplugging the display and power while your system is OFF.
Connecting Power
To power the screen, you only need to connect the 16-pin Eurorack power input (+/- 12V) which, out of the box, is already attached to Tiliqua in the correct orientation.
Connecting Video
In the box, you have 2 display cables. One short and one long. It’s up to you which cable you want to use and which panel hole, depending how far the screen is from Tiliqua in your modular system.
I prefer to use the long one and hide the spiral portion behind the screen, which gives me the option of moving it around without needing to reconnect the cable. In the box you will also find a 6hp spacer blank panel, which can be useful if you are using the spiral cable and need more space behind the panel in a skiff that is very thin.

You can connect with whichever cable or panel hole works for your system.
Display Timings
This screen only supports 720x720p60 resolution and has no built-in scaler. Whenever Tiliqua is in the bootloader, it reads the EDID from the display and switches to the correct resolution. This means, any user bitstreams used with the screen should have video: <match-bootloader> (dynamic modeline) or video: 720x720p60 (fixed modeline) to display correctly.
If you instead connect TLQ-SCREEN to a computer, it should also pick up the correct 720x720p60 timings from its EDID automatically and work as a monitor. It’s not a use case I explicitly support, but should work fine :)
Native Rotation
To fit such a large LCD panel into the Eurorack form factor, the entire panel is rotated 90 degrees. Normally, you won’t notice this as Tiliqua detects when TLQ-SCREEN is attached and automatically rotates the whole framebuffer 90 degrees in the bootloader and all user bitstreams.
However, if you connect TLQ-SCREEN to a computer or use a bitstream that does not support dynamic framebuffer rotation, then you will notice that the image will be rotated.
Note
If you want to physically rotate the entire screen in your rack (i.e upside-down or 90 degrees), some bitstreams let you rotate the entire display arbitrarily. XBEAM for example has an option that allows you to rotate the display in 90 degree increments, which can also be useful for inverted overhead projectors.
Firmware Updates
TLQ-SCREEN has an RP2040 inside it that contains firmware which contains the LCD panel initialization sequence, controls the built-in power switches and can modify the EDID. I don’t forsee this needing to be updated, nevertheless, if for some reason you need to update the firmware:
With
TLQ-SCREENunpowered, connect your computer to the update port and hold down the firmware update button.Apply power to
TLQ-SCREEN. A USB drive should appear. The LEDs should not be blinking.Copy the new firmware image to the USB drive and wait for the LEDs to start blinking.
TODO add link the the screen firmware repository when it is cleaned up.
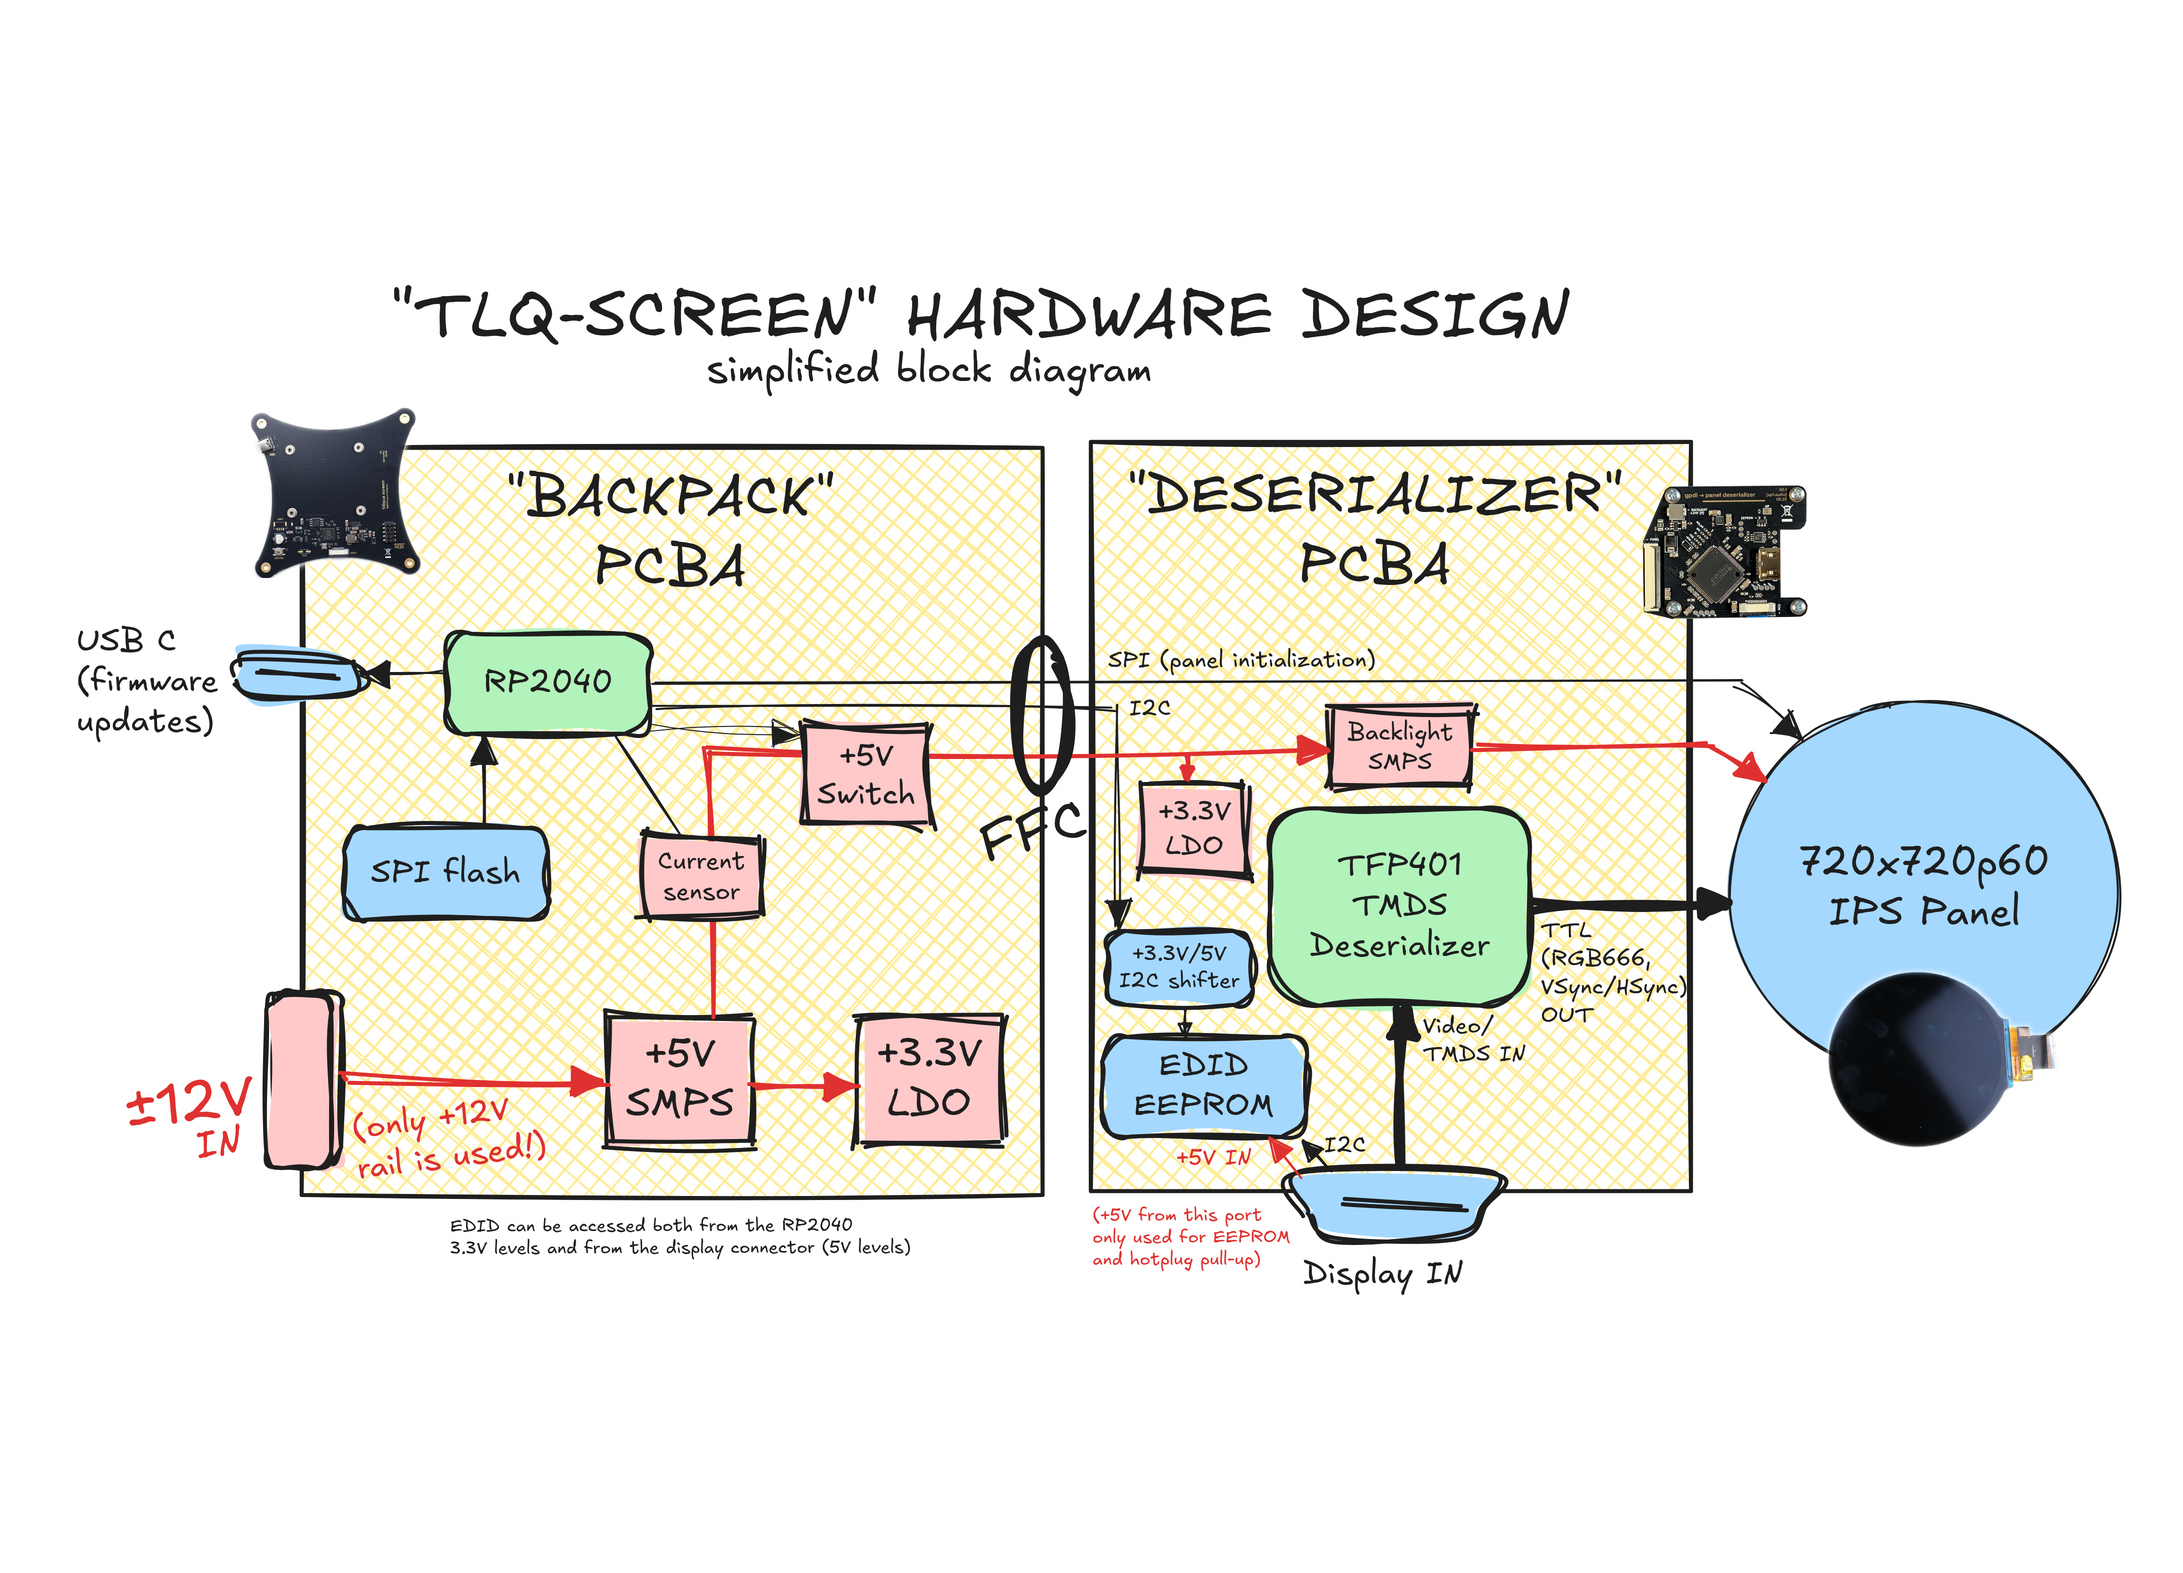
Hardware Block Diagram
For deeper details (and schematics) of the hardware, see TODO.
Instructions for Safe Use
TLQ-SCREEN shall only be used at the provided 720x720p60 display timings. To guarantee this, only connect TLQ-SCREEN to TLQ-MODULE when the Eurorack system is powered off. Use with video sources other than TLQ-MODULE, or different display resolutions is not supported.
The product shall only be used in a Eurorack system, providing a standard Eurorack power supply not exceeding +/- 12V, and at least 500mA. Any external case, power supply, cables, or modules shall comply with relevant regulations and standards applicable in the country of intended use.
To reach electromagnetic compatibility in a Eurorack system, the product shall be mounted securely in a fully enclosed housing made of conductive material (metal). Close all unused spaces with blind panels. Keep all cables, power or patch cables as short as possible.
The product should only be operated in a well ventilated case and should not be covered, except by the Eurorack case itself or other module panels. The product is designed for reliable operation at normal ambient room temperature. Do not expose the module to water, moisture or bring the circuit boards in contact with any conductive materials.
Take care whilst handling to avoid mechanical or electrical damage. When the product is powered on, do not touch any of the circuit boards behind the front panel. When the product is outside a case, only handle it unpowered and by the edges to minimize the risk of damage from electrostatic discharge.
Do not supply power to the product through any receptacle except the main +/- 12V power input. Any external devices not sharing the product’s main power bus (e.g. USB host devices or devices providing a display signal) should be disconnected when the product is unpowered. The incorrect usage or connection of unapproved devices to any receptacle may affect compliance or result in damage to the unit and invalidate the warranty.